Beginner Bodyweight Exercises Explained
Walk into any gym, and you'll see people using complicated machines, lifting heavy weights, and following routines that look like they require a degree to understand.
None of that is necessary to get stronger. Seriously.
Your body already contains everything you need to build functional strength. No equipment required. No monthly membership fees. No waiting for someone to finish using the squat rack.
Bodyweight training (which is a fancy way to say using your own weight as resistance) isn't just a "starter" approach you graduate from. It's a complete system that can challenge you for years, teaching your body the movement patterns humans evolved to perform.
This guide walks you through the fundamental exercises, explains what's actually happening in your body, and most importantly, shows you how to start at your real starting point instead of where fitness culture says you should be.
What Makes Bodyweight Training Different
Most exercise guides talk about targeting specific muscles: biceps, triceps, abs, glutes. But your body doesn't operate in isolated parts. It functions through integrated movement patterns.
When you pick something up off the ground, you're not just using your back or your legs, you're coordinating dozens of muscles across your entire body to complete a pattern called a hip hinge. When you push yourself up from lying down, you're executing a pushing pattern that involves your chest, arms, shoulders, and core working together.
There's another advantage that research shows: when you can work out in your living room at 6 AM or on your lunch break in your office, you remove the friction that makes people quit.
How Your Body Actually Gets Stronger
Before diving into specific movements, you need to understand one concept: adaptation.
Your body doesn't randomly get stronger. It responds to consistent challenges by adapting to handle those challenges more efficiently. If you regularly ask your muscles to push your body up from the floor, they'll gradually build the capacity to do that more easily.
This is called progressive overload, and it's the only mechanism through which strength improves. You either increase the difficulty (harder variation), the volume (more repetitions), the time under tension (slower movements or longer holds), or decrease the rest between efforts.
The trap most beginners fall into is trying to progress too quickly. They see someone doing a full push-up and force themselves through struggling, sloppy versions instead of building capacity with an easier variation. This just practices poor movement and increases injury risk.
Start where you honestly are. Build competence there. Progress when it feels almost easy.
The Six Movements That Matter
Squat Pattern: Sitting and Standing With Control

This is the movement pattern you do every time you sit in a chair or stand up from one. It trains your legs, hips, and core to work together as a system.
The basic version: Stand with feet about hip to shoulder-width apart, with a focus on what feels stable. Lower yourself down like you're reaching for a chair behind you, keeping your chest relatively upright. Go as deep as you can while maintaining control, then drive through your feet to stand back up.
If this feels impossible: Actually use a chair. Sit down fully, then stand back up. This isn't cheating. It's training the exact pattern with a built-in depth marker and safety net. Do this until it feels easy, then try hovering just above the chair before sitting, gradually increasing that hover time.
If your knees hurt: Your knees might be traveling too far forward, or you might be putting weight on your toes instead of your heels. Try sitting back more, like you're trying to sit in a chair that's farther away than you think. If pain persists, this might not be the right movement for your body right now. You could try glute bridges instead.
If you can't keep your balance: Hold onto a doorframe, countertop, or the back of a sturdy chair. No rule says you can't use your hands for stability while you're building the pattern.
Making it harder: Once you can easily do 15-20 controlled squats, try slowing down your descent to a three-second count, or hold the bottom position for five seconds before standing. You can also try single-leg variations by sitting on a bench with one leg and standing back up using mostly that leg.
Pushing Pattern: Moving Your Body Away From the Ground
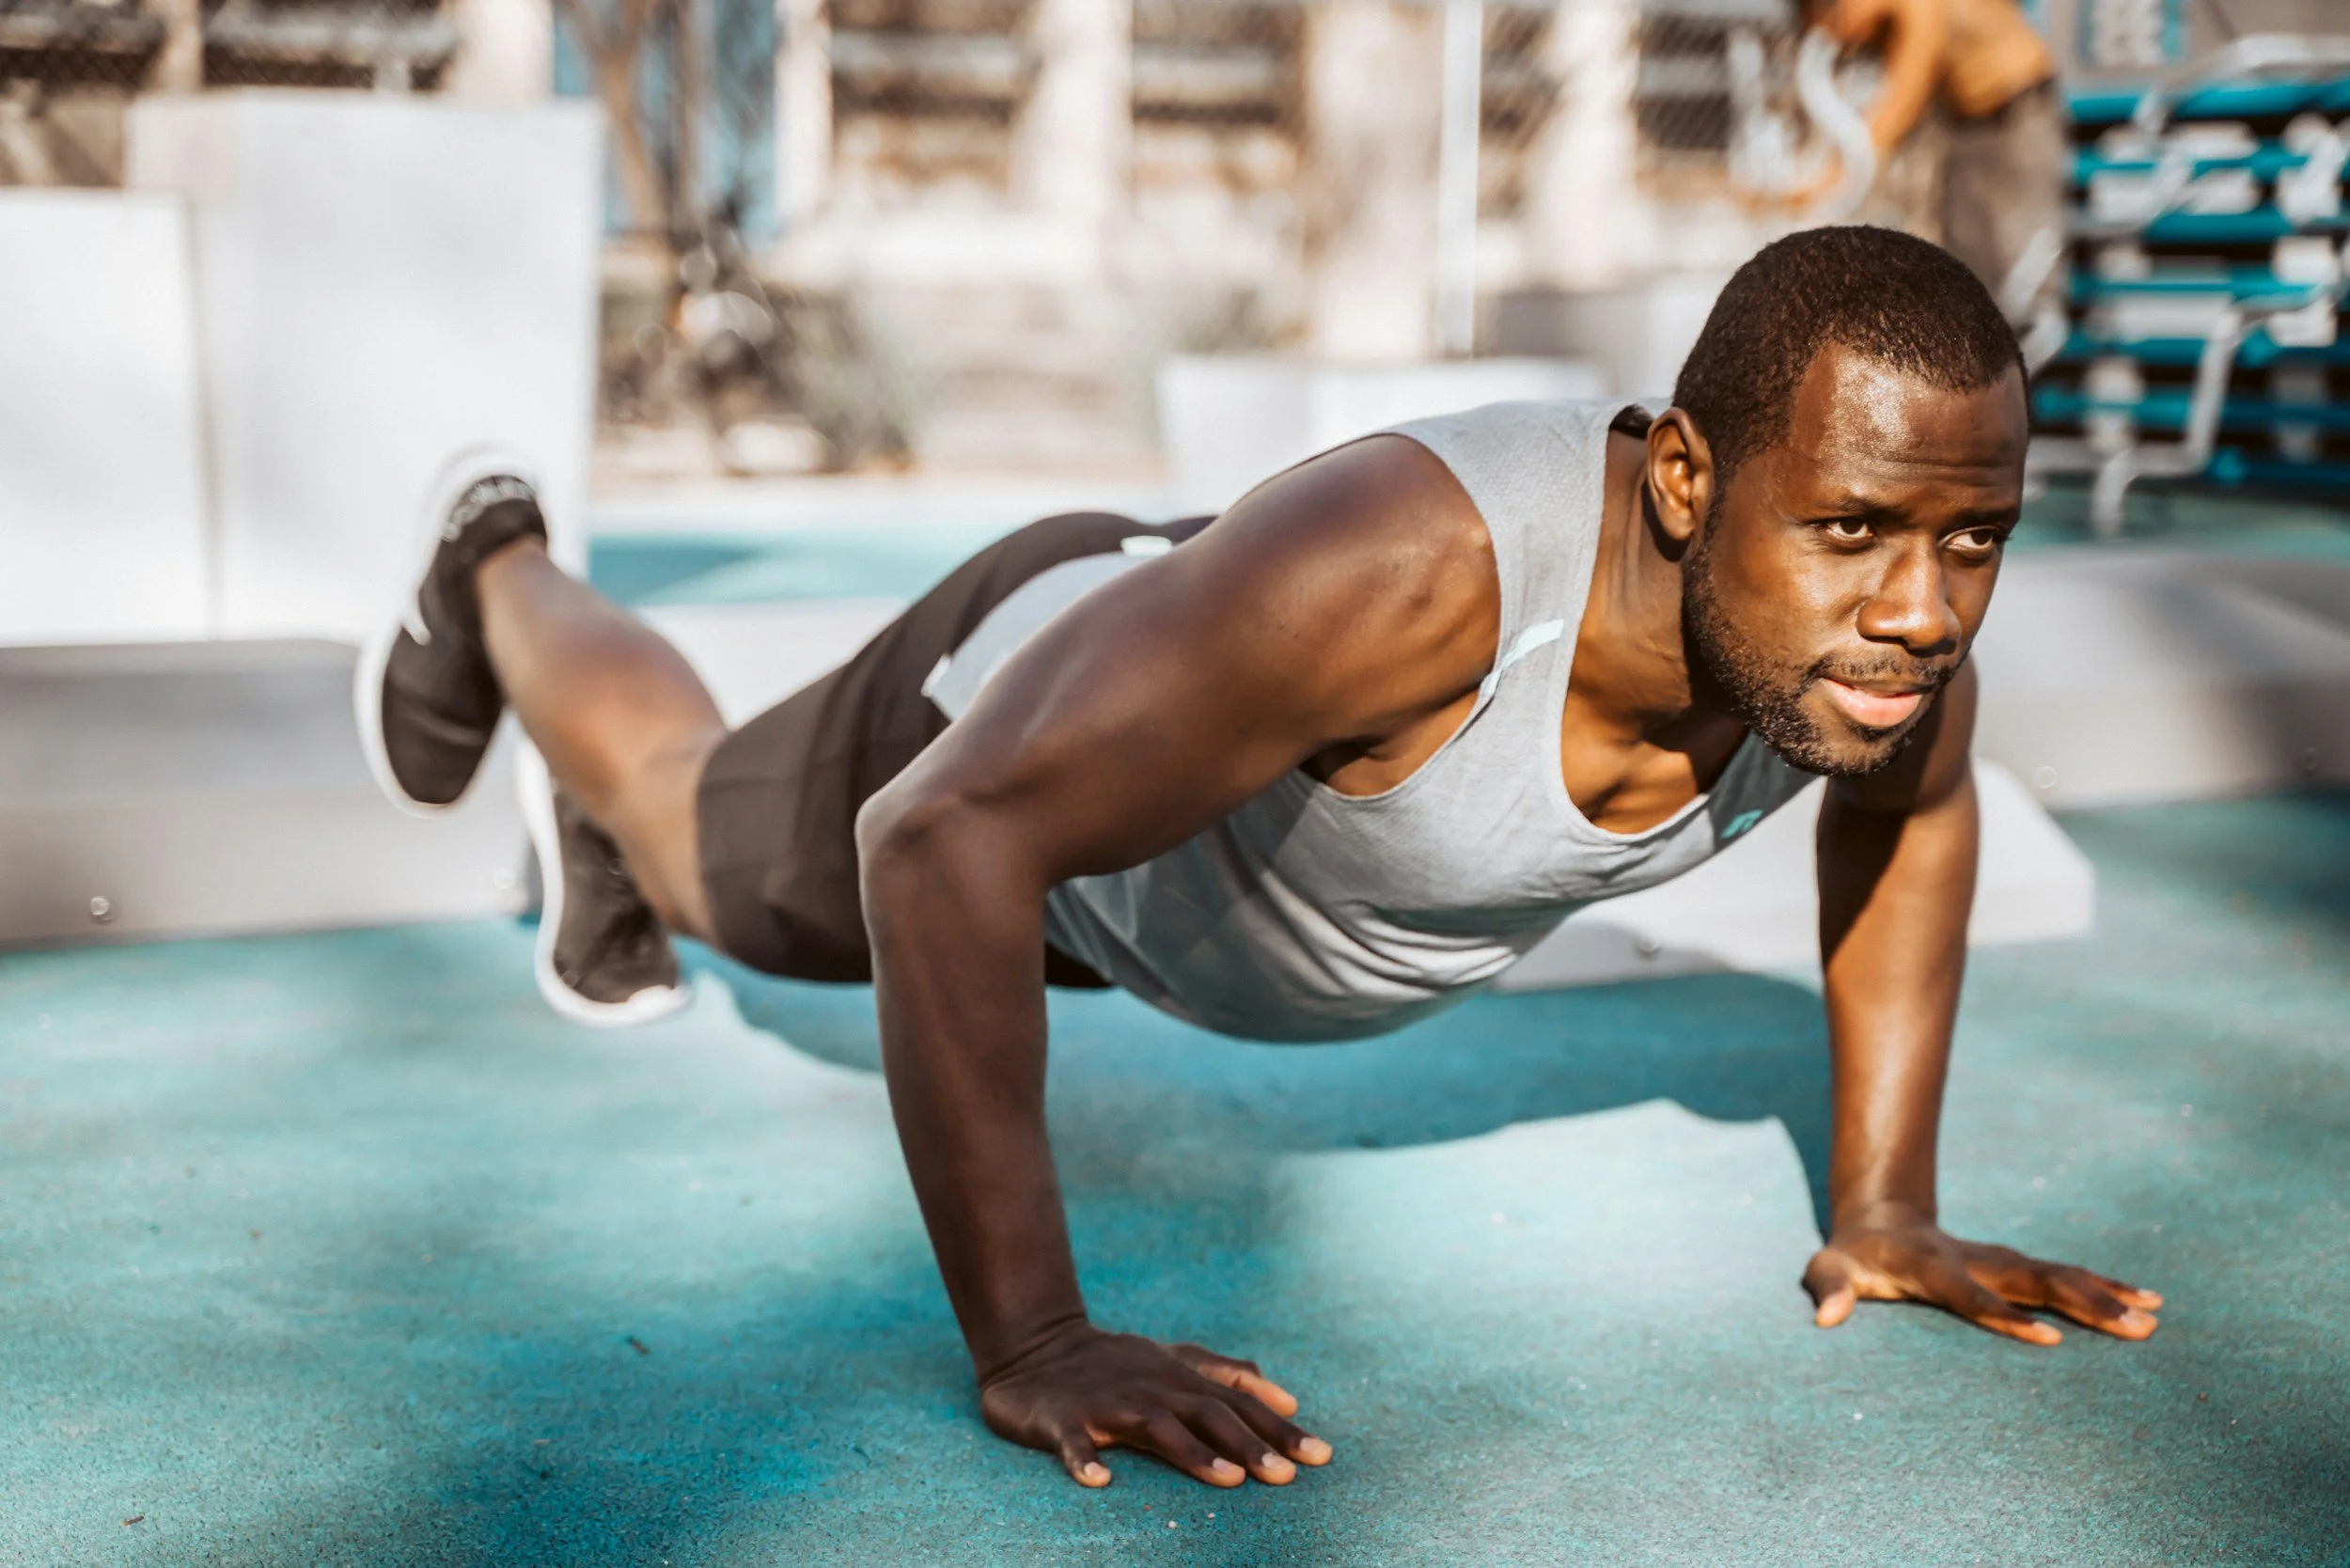
Push-ups train your body to function as one connected unit: your hands push the floor, but your abs, back, and legs all have to work to keep you stable.
The basic version: Place your hands on the floor slightly wider than your shoulders, body in a straight line from head to feet. Lower your chest toward the floor by bending your elbows, then push back up.
If this feels impossible: Change the angle. Push against a wall, then when that's easy, a kitchen counter, then a coffee table, then a low step, then the floor from your knees. Each decrease in height increases the challenge gradually. You're doing the same movement pattern, just with less of your bodyweight to move.
If your hips sag toward the floor: Your core isn't strong enough yet to hold that position. Move to an easier angle (higher hands) or drop to your knees. Both are legitimate ways to build strength.
If your elbows hurt: You might be flaring them straight out to the sides, which stresses your shoulder joints. Try keeping your elbows closer to your body, about 45 degrees out from your sides rather than 90 degrees.
Making it harder: When you can do 10-12 solid push-ups from one variation, try mixing in a few from the next hardest version. For example, if you're doing knee push-ups, try two from your toes, then drop back to your knees to finish the set. Gradually shift the ratio until you're doing most of your set from the harder variation.
Hip Hinge Pattern: Using Your Hips and Hamstrings
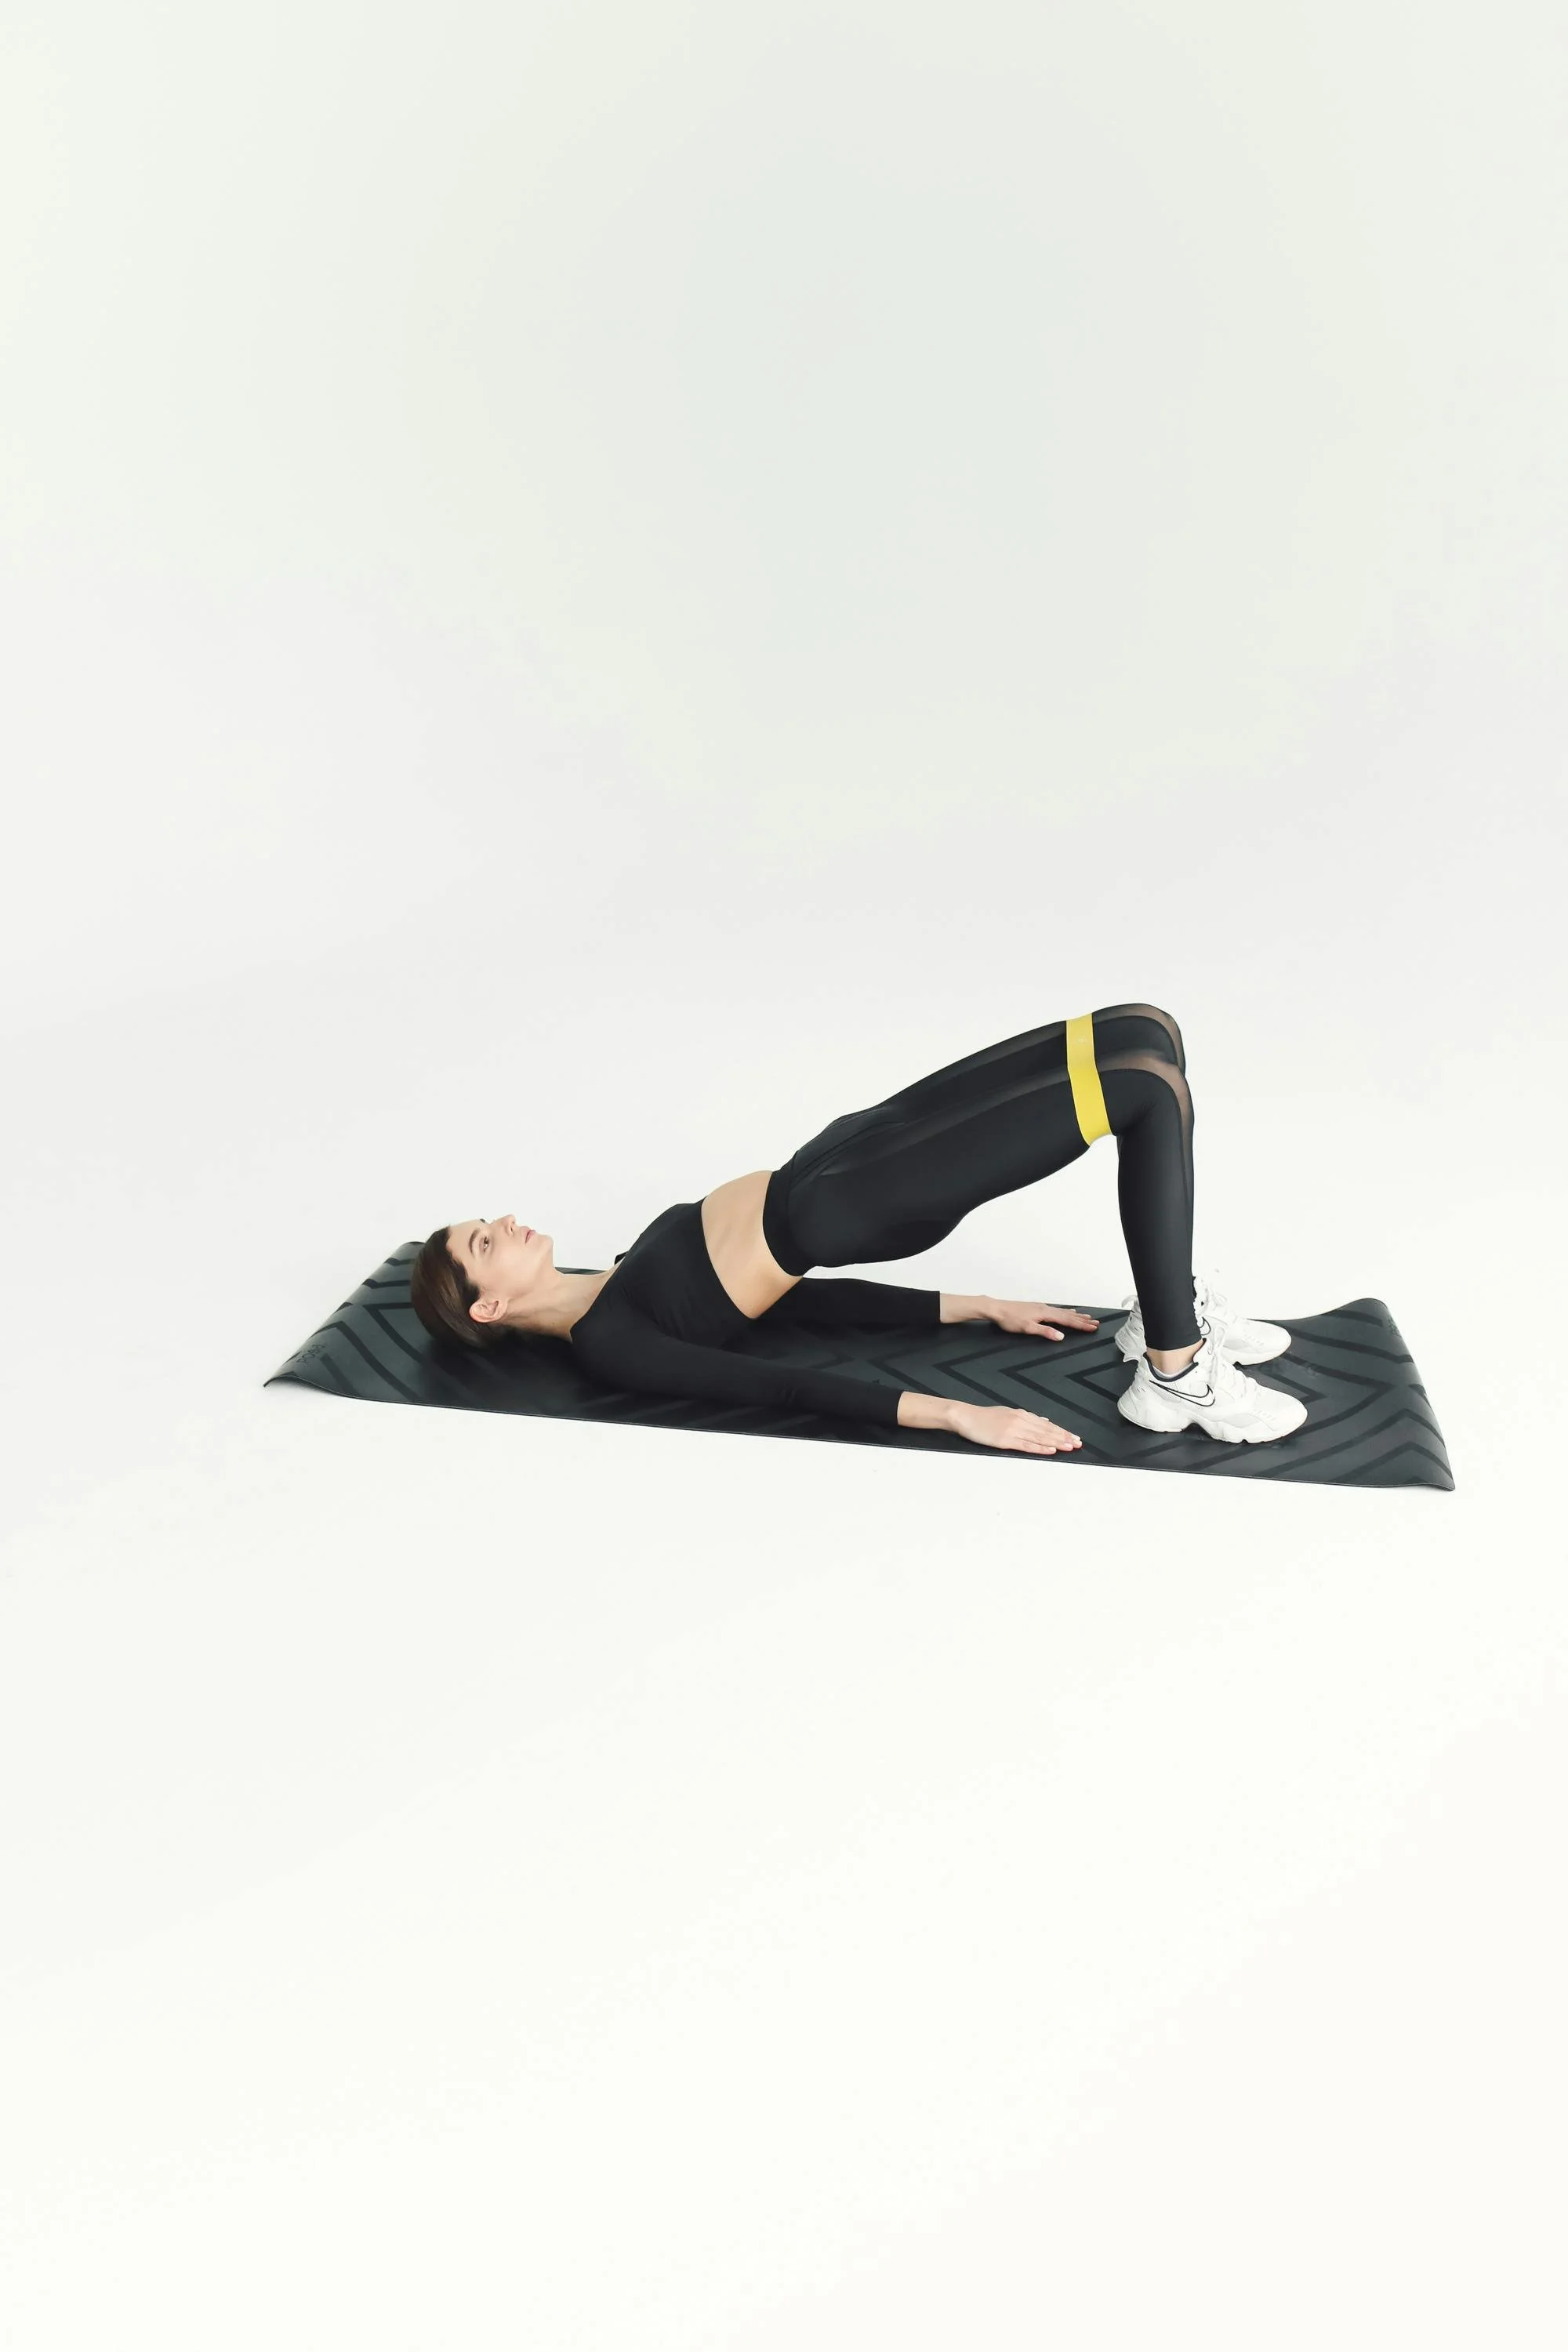
The glute bridge teaches your body to generate power from your hips: a pattern you use when lifting anything off the ground, climbing stairs, or standing up from a deep position.
The basic version: Lie on your back, knees bent, feet flat on the floor about hip-width apart. Press through your heels to lift your hips toward the ceiling, squeezing your glutes (butt muscles) at the top. Lower back down with control.
If you feel this in your lower back instead of your glutes: Two common issues: you're not squeezing your glutes hard enough at the top, or you're arching your lower back too much. Try this:at the top of the movement, imagine tucking your tailbone slightly under and actively squeezing your butt like you're trying to crack a walnut between your cheeks. Weird mental image, but it works.
If your hamstrings cramp: Your glutes probably aren't activating properly, so your hamstrings are compensating. Before you start, try squeezing your glutes a few times while lying down to wake them up. During the movement, really focus on initiating the lift from your butt, not your legs.
Making it harder: Hold the top position for 10-20 seconds, or try lifting one foot slightly off the ground so one leg does most of the work. Full single-leg bridges are significantly harder, build up to them slowly.
Glute Bridges tend to have a taboo that follow them, where you are afraid about looking awkward. No one will judge you, but this is a good reminder to try them at home if you possess a fear of doing these in public and what people will think.
Core Stability Pattern: The Plank

Planks build your core's ability to resist movement, to stay stable while forces try to rotate, bend, or twist your spine. This matters for every other exercise you'll ever do and for everyday activities like carrying groceries or picking up a kid.
The basic version: Get into a forearm plank position: forearms on the ground, elbows under shoulders, body in a straight line from head to heels. Hold this position while breathing normally.
If this feels impossible: Drop to your knees while keeping the same body position, or do the plank at an incline with your hands on a counter or bench. Both reduce how much bodyweight you're supporting.
If your hips sag or pike up: Your core is fatiguing. End the set. It's better to do three 10-second planks with good form than one 30-second plank where your hips collapse halfway through. You're not building useful strength with poor form, you're just practicing poor movement.
If you can't breathe: You're holding too much tension. A plank should be hard, but you should still be able to take full breaths. If you can't, you're either bracing too hard or the variation is too difficult. Move to an easier version.
Making it harder: Work up to holding 30-45 seconds with solid form before trying harder variations. Then you can try lifting one foot slightly off the ground, or moving to a straight-arm plank (hands instead of forearms).
Coordination Pattern: Bird Dog
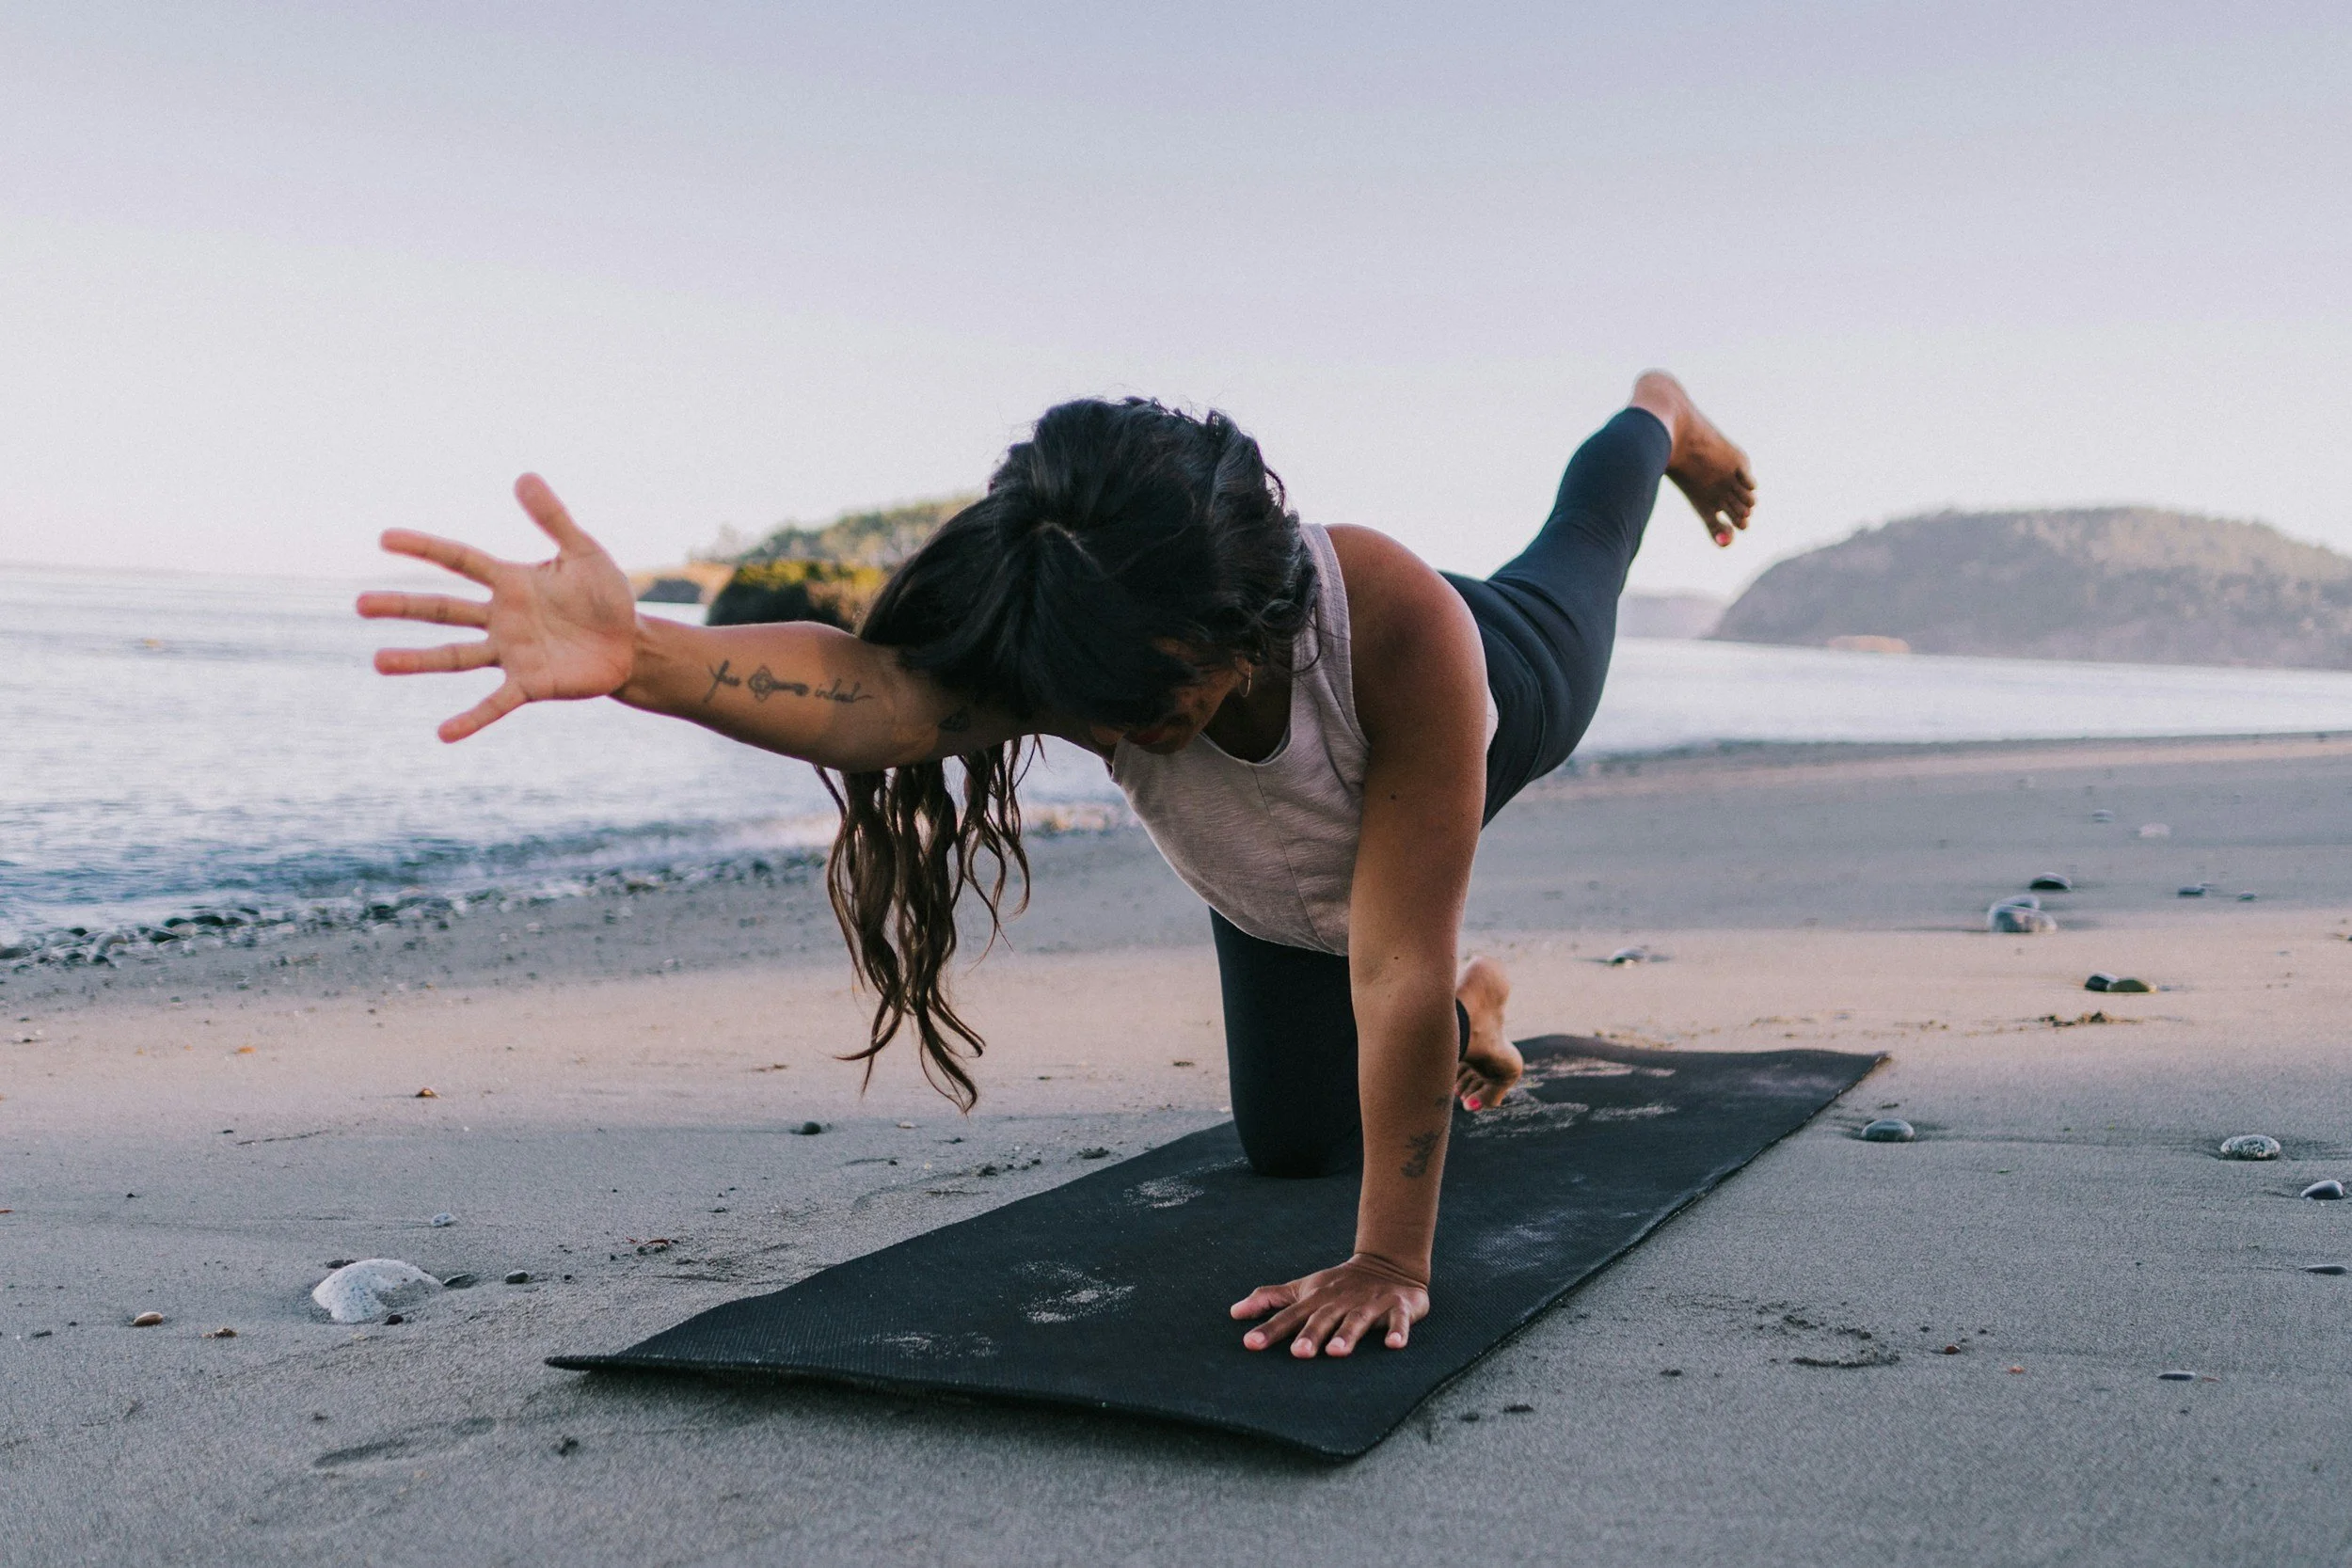
This exercise looks simple and feels surprisingly challenging. It trains your body to maintain core stability while your limbs move independently, which is exactly what happens when you walk, run, or reach for something.
The basic version: Start on hands and knees. Extend your right arm straight forward and your left leg straight back simultaneously, creating one long line from fingertips to toes. Hold briefly, return to start, then switch sides.
If you lose your balance immediately: Slow way down. This is about control. Try extending the arm first, then just the leg, before combining them. Your brain is building a new coordination pattern and needs time to figure it out.
If your lower back arches: Pull your belly button toward your spine to engage your core before you even lift anything. Imagine someone is about to punch you in the stomach and you're bracing for it, that's the level of core tension you want.
If your hips twist: Keep the movement smaller. Don't extend your leg as far back. Your goal is to keep your hips level and square to the ground, even if that means smaller movements initially.
Making it harder: Hold each position for 5-10 seconds instead of just briefly. Or add a small "pulse" at the end of your range of motion: extend fully, pulse an inch further, return.
Anti-Extension Core Pattern: Dead Bug
Despite the silly name, this is one of the most effective core exercises you can do. It teaches your lower back to stay stable while your arms and legs move.
The basic version: Lie on your back, arms reaching toward the ceiling, knees bent at 90 degrees (shins parallel to floor). Slowly extend your right arm overhead while straightening your left leg, hovering it just above the floor. Return to start and switch sides.
If your lower back arches off the floor: This is the most common issue and the most important one to fix. Press your lower back actively into the floor throughout the entire movement. If you can't keep it down, don't extend your limbs as far. The core stability matters more than the range of motion.
If this feels confusing: Start with just arms or just legs until the pattern clicks. Lie on your back and practice just lowering one arm overhead while keeping your back flat. Then add the leg movement once the arm part feels natural.
Making it harder: Add a resistance band around your feet for more challenge, or hold each extended position for 3-5 seconds before switching. You can also slow the entire movement down (take 3-4 seconds to extend, 3-4 seconds to return).
Building Your First Routine
You don't need an elaborate program. Here's a simple structure that works:
Choose one exercise from each pattern: one squat variation, one push variation, one hip hinge (glute bridge), one core stability (plank or dead bug), and optionally one coordination movement (bird dog).
For each exercise, do 2-3 sets. For movement exercises (squats, push-ups, bridges, bird dogs, dead bugs), aim for 8-12 repetitions per set. For holds (planks), aim for 15-30 seconds.
Rest 30-90 seconds between sets, which is enough to catch your breath, but not enough to fully recover.
Do this routine three times per week with at least one rest day between sessions. Your body needs recovery time to actually build strength.
That's the entire system. It sounds almost too simple, but research from the American Council on Exercise found that beginners who maintained basic, consistent routines for 12 weeks saw significantly greater improvements than those who constantly changed their programming (ACE, 2014). Your body adapts to repeated stress, not constant variety.
The Form Conversation
Fitness culture obsesses over "perfect form." Every exercise has supposedly one correct way to do it, and deviation means injury or ineffective training.
This is partially true and mostly unhelpful.
Yes, form matters. Controlling the movement, feeling the intended muscles work, and avoiding pain are all important. But your body is unique. Your proportions, joint structure, injury history, and mobility all affect what "good form" looks like for you.
Focus on these principles: Can you control the movement through the full range? Are you feeling it where you should? Can you breathe normally? Are you pain-free?
If the answer is yes to all four, your form is probably fine even if it doesn't match the textbook version. If you're unsure, filming yourself or working with a knowledgeable trainer for a session can help. But don't let the pursuit of perfect form become another barrier to starting.
Knowing When to Progress
The fitness industry pushes constant progression: more weight, more reps, harder variations. But progression isn't always linear, and it's not always the goal.
Your performance will fluctuate based on sleep, stress, nutrition, hormones, and a dozen other factors. Some weeks you'll feel strong. Some weeks the same workout that felt easy last week will feel impossible. This is completely normal.
Boredom is a sign of readiness. When an exercise starts feeling almost too easy, that's when your body has truly adapted and you're ready for the next challenge.
Mistakes That Derail Beginners
Starting too aggressively: Your motivation is highest at the beginning and will naturally decrease. If you start with hour-long workouts six days a week, where do you go when motivation fades? Start embarrassingly easy with three 15-minute sessions per week. Build from there.
Skipping the warm-up: Jumping straight into exercise with cold muscles increases injury risk. Spend five minutes doing arm circles, leg swings, light movement, and a few practice repetitions of your exercises at easy intensity. This prepares your nervous system and joints for work.
Training through actual pain: Muscle fatigue and discomfort are normal. Sharp pain, joint pain, or pain that doesn't go away with rest are signals to stop. Ignoring these signals leads to injuries that will sideline you for weeks or months. Not to mention if motivation is a struggle, it will REALLY be a struggle when you are hurt.
Using exercise as punishment: If your motivation is "I ate badly so I have to work out," you're building an unhealthy relationship with movement. Exercise should enhance your life, not compensate for living it.
Comparing your beginning to someone else's middle: The person doing perfect push-ups started somewhere, too. Your only relevant comparison is yourself last week, last month, last year.
What This Is Really About
Bodyweight exercises aren't ultimately about aesthetics or hitting fitness milestones. They're about reclaiming physical capability that sedentary modern life gradually takes away.
These exercises are tools for building a body you trust to support you in daily life. Not tests you pass or fail. Not obligations you resent. Not punishment for eating food or having a body.
Just movements that make you more capable.
Start with where you actually are. Do less than you think you should. Build slowly enough that it doesn't feel like building at all, just a sustainable practice that gradually makes everyday life easier.
The rest is just details.